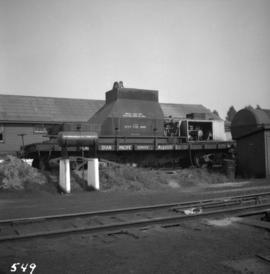
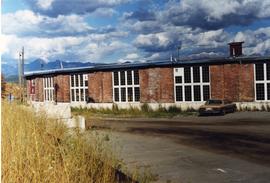
Photograph depicts a brick roundhouse of 5 or 6 stalls that were used for stores and non-locomotive activities.
Photograph depicts the C.P.R. Cowichan depot on Vancouver Island. The view is looking south.
Photograph depicts the C.P.R. Coquitlam yards.
File consists of documentary photographs taken by David Davies of a CPR coal train wreck near Lafarge in Kamloops, British Columbia.
Photograph depicts a CPR coal train crash near Lafarge.
Photograph depicts a CPR coal train crash near Lafarge. The mid-slave locomotive axle was locked. The train arrived after its first switch after locking and then climbed the switch blade. It then derailed with 30 loaded coal cars.
Photograph depicts a CPR coal train crash near Lafarge.
Photograph depicts a CPR coal train crash near Lafarge. Visible is an almost undamaged car that was isolated from the main line as it was ripped out from the spur trackage.
Photograph depicts a CPR coal train crash near Lafarge. Visible is a damaged slave unit that was salvaged and standing on a spur in the Kamloops CPR yard.
Photograph depicts a CPR coal train crash near Lafarge.
Photograph depicts a switch blade that was part of CPR coal train crash near Lafarge.
Photograph depicts a CPR coal train crash near Lafarge.
Photograph depicts the CPR Clayburn Diamond crossing (with the BC Hydro Railway) at mile 3.9 on the Huntingdon Branch. The view is looking south with the BC Hydro Railway tracks in the middle distance. CP Rail has the priority right of the road. There is a 15 mph speed restriction.
Photograph depicts Cisco Bridge that spanned the Fraser River 36 miles below Lytton in Fraser Canyon. It was believed to be the origininal bridge that was built with under slung girders.
Photograph depicts Cisco Bridge that spanned the Fraser River 36 miles below Lytton in Fraser Canyon. A power line in the background was just being erected from the Peace River Dam.
Photograph depicts the CPR depot at Chute Lake, on the Carmi Subdivision. It is located at mile 106.5 and 13.5 miles north of Penticton.
Photograph depicts the CPR depot at Chute Lake, on the Carmi Subdivision. It is located at mile 106.5 and 13.5 miles north of Penticton. The photo shows the passing track and the base of a former water tower is just behind the camera at the left. The rail here is dated 1942.
Photograph taken looking west towards the 3 mile branch to a local mill.
Photograph depicts the CPR at Haig, B.C. It is at mile 40.1 from North Bend. It is close to Hope but on the opposite side of the Fraser River. This is a water tank car, formerly a locomotive tender, possibly #41575. It had no dates.
Postcard taken along the CPR line, at a camp in Yoho Valley.
Photograph depicts CPR cabooses in Revelstoke.
Photograph depicts CPR cabooses travelling in the eastern outskirts of Kamloops.
Photograph depicts 2 of 3 locally based cabooses.
Photograph depicts a steel C.P.R. caboose near Ballantyne Pier in Vancouver, B.C.
Photograph depicts a CPR caboose #436917 in New Westminster. It is all wood and was built in 1928. It was lettered "Rubbish service between New Westminster and Coquitlam." A crewman said it was quiet running compared to modern all metal ones.
Photograph depicts CPR caboose #437149 at Revelstoke. It was built in June 1945 and is made of wood, which is a rarity because most cabooses are now all metal. It was used for work trains, but certainly not for main line regular freight workings.
Photograph depicts a metal C.P.R. caboose at Osoyoos, B.C.
Photograph depicts the body of a slightly damaged CPR caboose sitting on a gondola. Damaged as a result of an accident in the Kamloops yard, which is where the photograph was taken. Caboose was on its way to Calgary.
Photograph depicts a CPR caboose sitting in a gondola in the Kamloops yard after being rammed in a switching accident. Another caboose is visible. Both cabooses were still used for local freights, ballast trains, etc.
Photograph depicts a damaged caboose body sitting in a gondola car. Damaged as a result of an accident in the Kamloops yard, where the photograph was taken.
Photograph depicts a CPR caboose in the Revelstoke rail yard.
Photograph depicts a damaged CPR caboose body sitting on a gondola. Damaged as a result of an accident in the Kamloops yard, the location fo the photo.
Photograph depicts a slightly damaged CPR caboose sitting in a gondola. Damaged as a result of an accident in August at the Kamloops yard. It was on its way to Calgary.
Photograph depicts the C.P.R. bunk car in breakdown train at the Coquitlam yards.
Photograph depicts CPR buildings near Shawnigan Lake depot on Vancouver Island. The buildings in the centre are a section house (left) and a speeder or tool shed (right). They sit inside a wye track. Spur on the left is all that is left of "Y" turning center. The view is looking south. The Shawnigan Lake station (not depicted) is located at mile post 27.8 approximately 1/2 mile to the railway south of these buildings which are to the south of the photographer.
Photograph depicts CPR Budd Car #9055 at the False Creek yards. It is unknown where this car operates as there are no local CPR services that use Budd cars.
Postcard depicts the CPR bridge over the Columbia River.